Rubber Stampin’ Math Part 2
Last time in Part 1 of Rubber Stampin’ Math we talked about dusting off those rubber stamps and using them to create expressions, equations, and arrays. In Part 2, I’m going to share how I used them in second and third grade to introduce multiplication and how that translated to algebraic functions in fourth and fifth grade.
Part 2: Multiplication and Functions
For these next activities, the type of rubber stamps students use is very important. So let’s start with something fun. Take a close look at the stamps in the photo below. One of them does not belong with the group. Can you figure out which one?
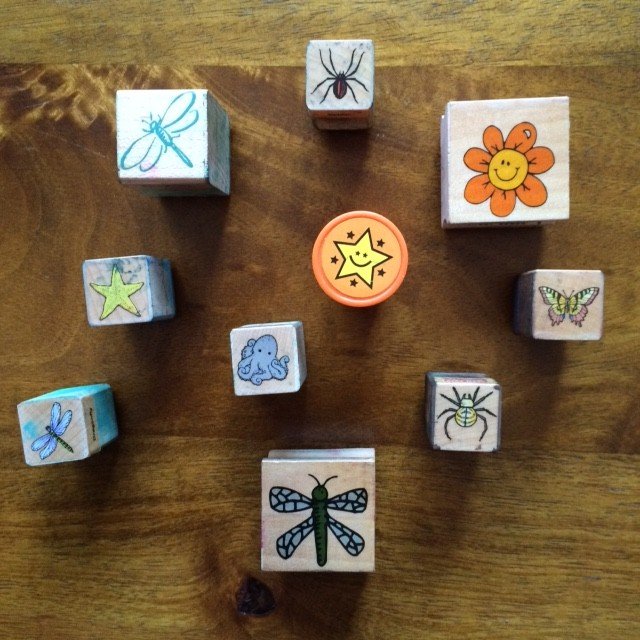
You probably came up with several options for the incorrect stamp. Maybe it’s the orange star stamp because it’s a circle…or it’s plastic…or it’s in full color. But that’s not the one.
Maybe it’s the yellow star to the left because it’s the only one that doesn’t have eyes? (I’m grasping here…but kids will, too!).
Nope, that’s not the one.
It’s actually the octopus. Why that one? Although we know that an octopus has 8 legs, it’s hard to look at that stamp and be able to count each one. The stamps we need for these next activities must have “parts” that can be counted. The legs on the spiders can easily be counted. The wings on the butterfly and dragonflies can be counted…the points on the star… But the octopus? Well those legs are hard to count so that stamp is out.
Now that we have a bunch of stamps with parts that are easy to count, we’re going to explore beginning multiplication. For this activity, I created a t-table where students could stamp in rows starting with one stamp in the first row, two stamps in the second row, etc. In the photo below, Miranda chose to stamp butterflies. In the second column, she needed to write the total number of wings on all the butterflies in each row. Notice how easy it is to count the wings.
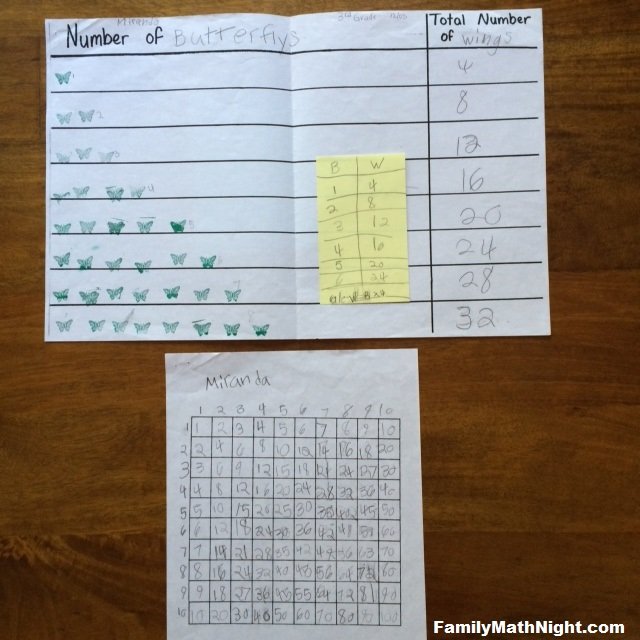
The next step was to have her transfer the numbers in the ‘wings’ column to a multiplication table. That’s what you see in the photo below the t-table. She created a t-table for each of the numbers 2-9 and transferred the numbers. We didn’t stamp the numbers 1 or 10 since they were pretty easy.
When all of Miranda’s numbers had been transferred to the 10 x 10 grid, what she ended up with was the multiplication matrix. But not just any multiplication matrix. A matrix where each of the numbers had meaning. ’24’ became 6 butterflies each with 4 wings. Or maybe it was 3 spiders with 8 legs each. The connection between multiplication and repeated addition was solidifying.
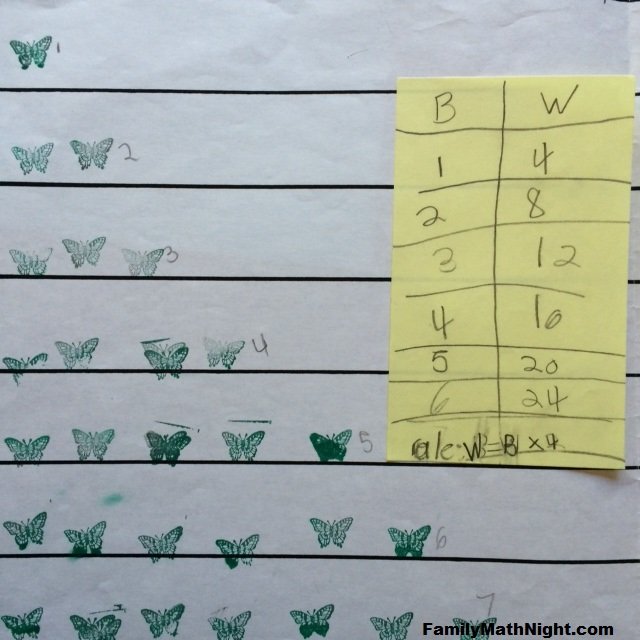
At this point, there were some students who were ready for the next level of abstraction. Miranda was one of them and that’s where the yellow post-it comes in. Now we’re getting into algebra. B = butterflies and W = wings. In the left column, she wrote the number to represent the butterflies. In the right column she wrote the total number of wings for the particular number of butterflies. No more counting wings.
In fourth and fifth grade I take it a level higher and we start moving towards functions. I do a few quick activities like the ones described above and then everything becomes abstract. We switch from ‘Number of Butterflies’ and ‘Total Number of Wings’ to ‘In’ and ‘Out’. It looks something like this:
| IN | OUT |
| 1 | 4 |
| 2 | 8 |
| 3 | 12 |
| 4 | 16 |
From there it’s a simple morph into ‘X’ and ‘Y’ columns and creating equations: 4x = y. Once they understand the ‘Y’ column is a function of the ‘X’ column (and the same thing needs to happen to each number in the ‘X’ column), we move to equations such as 2x + 2 = y. Easy peasy. Really. They love it!
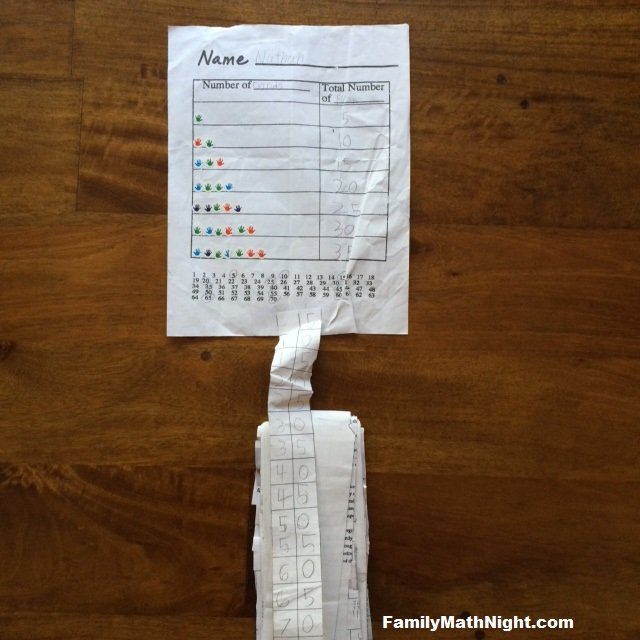
Although we’ve been using rubber stamps in all these activities, stickers with parts that can be easily counted, work just as well. For example, here’s an activity that I did in…are you sitting down…Kindergarten:
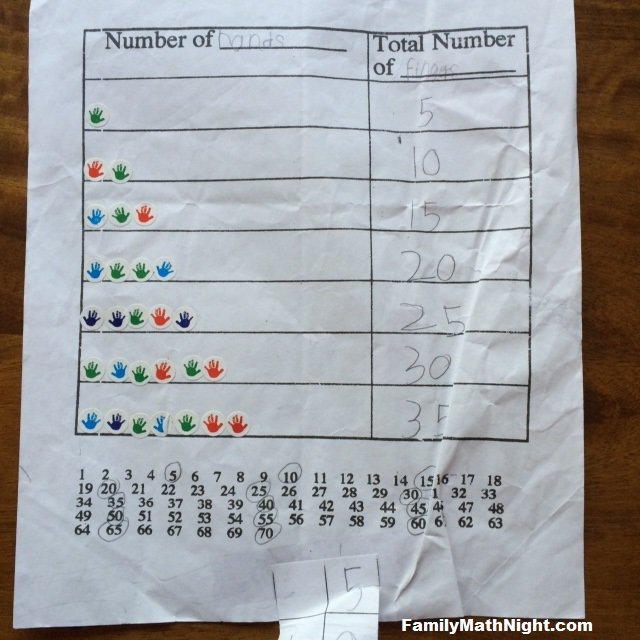
The students got so into looking for number patterns on the hundreds chart that I thought I’d give this activity a go. Turns out, they loved it! I included a number grid below the t-table so they could circle the numbers that showed up in the second column. Next time, I would arrange the numbers to look more like the hundreds chart.
Then I used strips of graph paper taped together to represent the ones and the tens column. The students who were ready for this part wrote the numbers in the columns and then looked for patterns. It’s hard to see in the photo but this particular kindergartner got sooooo into this that, once he discovered the pattern, he took the numbers all the way to 4,110. Yup. That’s four thousand one hundred ten. Amazing. And my rubber stamp collection started the whole thing!
Happy stamping!